
08-31-2009, 09:26 AM
|
|
Jaguar
|
|
Join Date: Aug 2009
Location: USA, CA
Posts: 82
|
|
|
[GUIDE] EVGA X58 Snow Leopard Mac OS X 10.6.6 (10J567) Installation
OSX LION 10.7.2 INSTALLATION
From 10.6.0 to 10.6.6
Prerequisites:
Quote:
1. A working OS X Installation: iMacs, MacBooks, ... or
2. Retail/Beta copy of Snow Leopard
3. A HD to install Snow Leopard on, [ this is a separate HDD ]
4. Airwalk's EXTRA FOLDER - Click to download
5. Airwalk's DSDT.aml - I prefer you create your own so it specifies your own hardware.
6. Chameleon RC4 Installer - Click to download, or w/e the latest version is.
7. SET YOUR BIOS SETTINGS: TO ENABLE, ENABLE, AHCI MODE + IDE, AHCI MODE - just the jmicron stuff
8. Apple Combo Updater 10.6.6
9. Make sure to look at notes in the bottom & help fellow members if they struggle. i suggest reading the whole thread after the succesful install.
This installation will take about 1-3 hours tops so be patient. it'll even take a whole day if you dont know what your doing...
Before you install, change IDE to AHCI Mode.
|
Installation:
Step 1:
Quote:
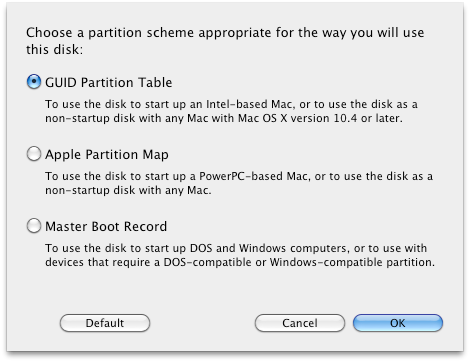
Connect the Hardrive for the Snow kitty installation: USB Enclosure or to another Sata connection, i prefer SATA because it is much faster. Once it is connected, open up Disk Utility. Click the Hardrive and format it to GUID.
|
Step 2:
Quote:
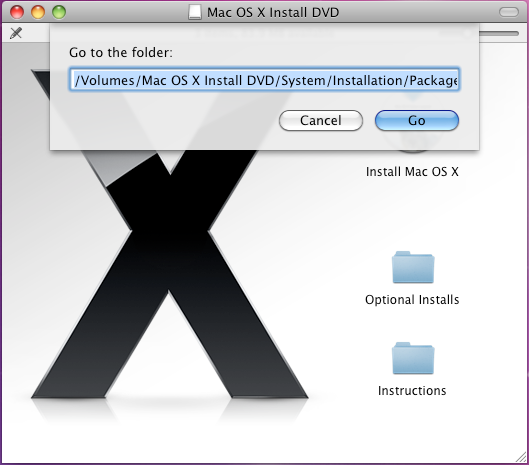
Mount/Click your Snow Leopard Install file. Once the Install window pops up, hold the these keys [ Shift + Command + G ] and enter
Code:
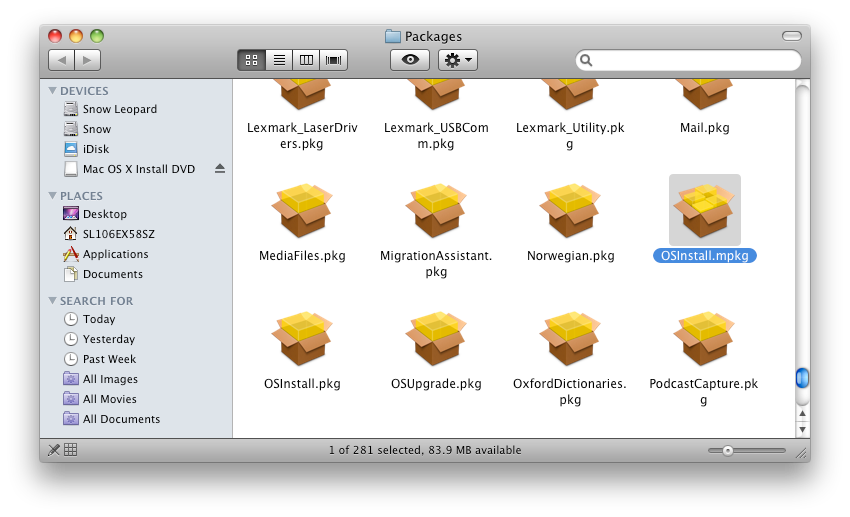
/Volumes/Mac OS X Install DVD/System/Installation/Packages
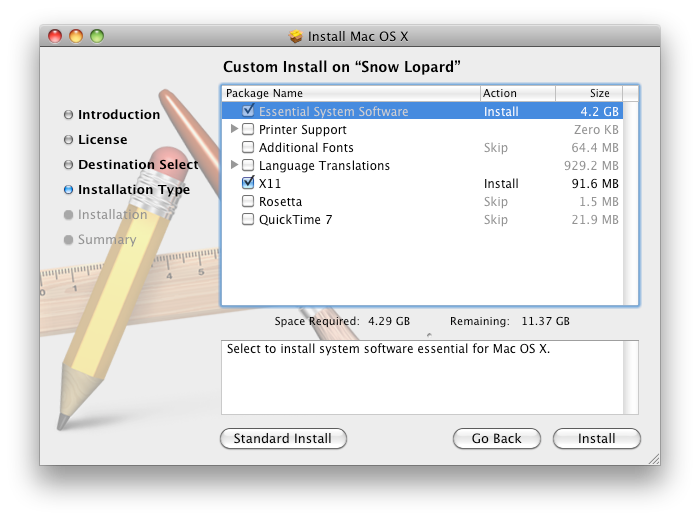
. A window will pop up showing all the hidden packages. Find the install package called "OSInstall.mpkg" and run it. Customize your installation or it will fail. Do not include the files you do not need. Installation should take around 10 - 20 minutes. DO NOT REBOOT after it is done.
|
Step 3:
Quote:
|
Install CHAMELEON into your Snow leopard hd. This is very straight forward.
|
Step 4:
Quote:
Now we need to install the kext files. Go get Airwalk's EXTRA folder and just copy and paste it. (replacing EXTRA folder that currently exist).
|
Step 5:
Quote:
Now we need to make/edit the boot.plist file located in the EXTRA folder. Open up the apple.boot.plist and replace the text with this:
Code:
<?xml version="1.0" encoding="UTF-8"?>
<!DOCTYPE plist PUBLIC "-//Apple Computer//DTD PLIST 1.0//EN" "http://www.apple.com/DTDs/PropertyList-1.0.dtd">
<plist version="1.0">
<dict>
    <key>Kernel</key>
    <string>mach_kernel</string>
    <key>Kernel Flags</key>
    <string>busratio=20 -x64 boot-uuid=93F4654A-DEAC-3A5D-9FB9-4AAF355BAD3D</string>  REPLACE UUID WITH YOUR OWN UUID. You can locate your UUID by browsing to DISK UTILITY and right click on the Snow leopard hardrive and click on INFORMATION. Copy your Universal Unique Identifier and paste it where mine is.
    <key>Graphics Mode</key>
    <string>1920x1200x32</string> REPLACE THIS WITH YOUR MONITOR RESOLUTION
    <key>device-properties</key>
    <string>REPLACE THIS WITH YOUR OWN GRAPHICS CARD EFI STRING</string>
</dict>
</plist>
Generating EFI STRING for your NVDIA Graphics Card: http://aquamac.proboards.com/index.c...ck1&thread=509
Heres a sample of my clean boot.plist
Code:
<?xml version="1.0" encoding="UTF-8"?>
<!DOCTYPE plist PUBLIC "-//Apple Computer//DTD PLIST 1.0//EN" "http://www.apple.com/DTDs/PropertyList-1.0.dtd">
<plist version="1.0">
<dict>
    <key>Kernel</key>
    <string>mach_kernel</string>
    <key>Kernel Flags</key>
    <string>busratio=20 -x64 boot-uuid=93F4654A-DEAC-3A5D-9FB9-4AAF355BAD3D</string>
    <key>Quiet Boot</key>
    <string>Yes</string>
    <key>GUI</key>
    <string>No</string>
    <key>Graphics Mode</key>
    <string>1920x1200x32</string>
    <key>device-properties</key>
    <string>d10300000100000001000000c50300001500000002010c00d041030a010000000101060000070101060000007fff040014000000400032002c006e0061006d00650000001100000073656e736f722d706172656e74220000005600520041004d002c0074006f00740061006c00730069007a0065000000080000000000002036000000400032002c00680077006300740072006c002d0070006100720061006d0073002d00760065007200730069006f006e00000008000000000000021c0000006400650076006900630065005f0074007900700065000000100000004e5644412c4765466f7263650e0000006e0061006d00650000000f0000004e5644412c506172656e7422000000400030002c006400650076006900630065005f00740079007000650000000b000000646973706c6179100000006d006f00640065006c0000001e0000004e5649444941204765466f72636520393830302047542044444c22000000400031002c006400650076006900630065005f00740079007000650000000b000000646973706c617912000000400032002c007200650067000000080000000000000222000000400032002c006400650076006900630065005f0074007900700065000000120000004e5644412c6770752d64696f646520000000400032002c0063006f006d00700061007400690062006c0065000000160000004e5644412c73656e736f722d706172656e7422000000400032002c002300730069007a0065002d00630065006c006c0073000000080000000000000020000000400031002c0063006f006d00700061007400690062006c00650000000e0000004e5644412c4e564d616314000000400030002c006e0061006d0065000000120000004e5644412c446973706c61792d413a000000400032002c0068007700730065006e0073006f0072002d0070006100720061006d0073002d00760065007200730069006f006e000000080000000000000226000000400032002c0023006100640072006500730073002d00630065006c006c0073000000080000000000000114000000400031002c006e0061006d0065000000120000004e5644412c446973706c61792d4220000000400030002c0063006f006d00700061007400690062006c00650000000e0000004e5644412c4e564d61631e00000072006f006d002d007200650076006900730069006f006e000000090000003331373261100000004e00560043004100500000001800000004000000000003000c00000000000007000000000e0000004e00560050004d0000002000000001000000000000000000000000000000000000000000000000000000</string>
</dict>
</plist>
|
Step 6:
Quote:
If you dont want to create your DSDT.aml file, get AIRWALK's dsdt.aml file and just place it in your EXTRA FOLDER.
You need to generate and compile/Edit your own DSDT.aml file so there wont be any complications on using others DSDT file. Copy/Paste it to EXTRA Folder
Creating DSDT.aml
http://osx86.co/f84/a-quick-guide-to-dsdt-t3436/
DSDT Auto-Patcher - does the steps in the bottom with a program, so you dont need to do it manually.
http://www.insanelymac.com/forum/ind...owtopic=235523
Quoted from SaCleoCheater:
Quote:
Step 3: DSDT. Your going to need a modded DSDT to stop the annoying CMOS reset bug.
Download iasl and extract it to /usr/bin on your CURRENT BOOTED VOLUME! - This will allow modification of a compiled DSDT.
once you have your DSDT.aml located in the root of your volume, open Terminal..
Code:
sudo -s
iasl -d /Path/to/dsdt.aml
You should have a dsdt.dsl located in / now, that is decompiled and editable.
open dsdt.dsl and search for "RTC"/ Find Code:
0x08 //Length
below "Device (RTC)" or "Device (RTC0" and replace the "8" (or whatever number it may be) with a "2". So it looks something like this: Code:
0x02 //Length
. here's what it should fully look like:
Code:
}
Device (RTC)
{
Name (_HID, EisaId ("PNP0B00"))
Name (_CRS, ResourceTemplate ()
{
IO (Decode16,
0x0070, // Range Minimum
0x0070, // Range Maximum
0x01, // Alignment
0x02, // Length
)
})
}
Save it, and run the following through terminal:
Code:
sudo -s
iasl -ta /Path/to/dsdt.dsl
You should now have a compiled DSDT.aml located in /. Copy it to the EXTRA folder of your Snow Leopard volume.
|
|
Step 7:
Quote:
Now you need a SMbios.plist to edit your system profiler information. just edit the UUID so it matches your system uuid's like the hardrive.
Code:
<?xml version="1.0" encoding="UTF-8"?>
<!DOCTYPE plist PUBLIC "-//Apple//DTD PLIST 1.0//EN" "http://www.apple.com/DTDs/PropertyList-1.0.dtd">
<plist version="1.0">
<dict>
    <key>SMUUID</key>
    <string>96DA8127-73E2-3405-80DF-1A3ED8699FBA</string>
    <key>SMbiosdate</key>
    <string>2/29/2008</string>
    <key>SMbiosvendor</key>
    <string>Apple Inc.</string>
    <key>SMbiosversion</key>
    <string>MP31.88Z.00C1.B00.0802091544</string>
    <key>SMboardmanufacturer</key>
    <string>Apple Computer, Inc.</string>
    <key>SMboardproduct</key>
    <string>Mac-F42C88C8</string>
    <key>SMfamily</key>
    <string>MacPro</string>
    <key>SMmanufacturer</key>
    <string>Apple Inc.</string>
    <key>SMmemmanufacter</key>
    <string>OCZ</string>
    <key>SMmempart</key>
    <string>OCZ3P1600LV6GK</string>
    <key>SMmemserial_1</key>
    <string>000123-01234567-0</string>
    <key>SMmemserial_2</key>
    <string>EMPTY</string>
    <key>SMmemserial_3</key>
    <string>000123-01234567-1</string>
    <key>SMmemserial_4</key>
    <string>EMPTY</string>
    <key>SMmemserial_5</key>
    <string>000123-01234567-2</string>
    <key>SMmemserial_6</key>
    <string>EMPTY</string>
    <key>SMmemspeed</key>
    <string>1600</string>
    <key>SMmemtype</key>
    <string>24</string>
    <key>SMproductname</key>
    <string>Mac Pro 4,1</string>
    <key>SMserial</key>
    <string>CK034KMHK5B</string>
    <key>SMsystemversion</key>
    <string>1.0</string>
</dict>
</plist>

|
Step 8:
Quote:
Now we can reboot. Just boot the Snow Leopard HD and it will play the snow leopard intro. to skip registration, press [ Command + Q ] and skip.
if it doesnt boot try [ -v -f ]
|
Step 9:
Quote:
After it boots up, just UPDATE using COMBO UPDATE 10.6.6 from apple's website. [MANUALLY]. After you update, sound is not going to work, just use this http://www.kexts.com/view/405-binary_patched_applehda.kext_for_alc889_(mac_os_x_ 10.6.4).html
Instructions:
Quote:
Download AppleHDA.kext
Open Terminal and type these commands:
sudo cp -R AppleHDA.kext /System/Library/Extensions/
sudo chown -R root:wheel /System/Library/Extensions/AppleHDA.kext
sudo chmod -R 755 /System/Library/Extensions/AppleHDA.kext
Wait about 15 minutes (kextcache needs to rebuild) or use pfix to manually rebuild cache, then reboot and you should have audio back!
Notice: You might need to manually remove caches, use this command: sudo rm -rf /system/Library/Caches/com.apple.kext.caches
|
|
Step 10:
Quote:
|
Dont forget to Repair permissions in DISK UTILITY after youve done everything.
|
Step 11: CREDITS to xxxslayeriiixxx, Airwalk, msinfo_us, jae-v & the whole OSX86 community.
-------------------------------------------------------------------------------
IMPORTANT NOTES:
Quote:
How to - Native power management, speedstep, Turbo function
|
Quote:
|
When Using Carbon Cloner to copy everything and booting on the "backup drive", you have to reinstall chameleon on the backup drive in order for it to boot.
|
Quote:
Originally Posted by airwalk776

if anyone is interested in optical out audio
the legacyhda file here http://www.tonymacx86.com/viewtopic....t=1686&start=0
along with the vanilla applehda.kext from 10.6.2 works great
and no popping when sound is initialized
works great
AirWalk
BTW I am running 10.6.4 on EVGA x58 SLI board. ( the audio chipset is a 889a) |
Quote:
Originally Posted by airwalk776
|
Quote:
Originally Posted by airwalk776
if anyone interested ful ntfs support in sl 64 bit
1st remove any 3rd party ntfs drivers you installed already (like paragon ntfs check there website for uninstall instructions)
2nd enable 64 bit mode again by removing arch=-i386 from the com.apple.boot.plist in /extra folder
3rd install NTFS-3G_2009.4.4-catacombae BE sure to select customize when installing an UNCHECK MacFUSE. DONT RESTART right now
http://downloads.sourceforge.net/cat...mg?use_mirror=
4.install MacFUSE2.1.7 http://groups.google.com/group/macfu...e55623e8b8f57?
reboot |
Code:
BIOS:E758_SZ2Z
Motherboard:EVGA x58 132-BL-E758-A1
CPU:Intel Core i7 920 @ 4.0 GHz
OS:Snow Leopard 10J567:x64 Vanilla
Memory:24 GB G.skill DDR3 1333 MHz
HDD:10 x 1TB Western Digital Caviar Black
Graphics Card:EVGA Geforce GTX480 1536 mb
Monitor:Dell Ultrasharp 2408WFP Rev. A02
Audio: Onboard
Last edited by xxxslayeriiixxx; 11-10-2011 at 08:32 AM.
|


 Threaded Mode